Preparation for Winter
By: Richard Wahl
My First Season
I have to admit that after a fellow beekeeper assisted me in catching my first swarm thirteen years ago, I had no idea what I was getting into. How hard could it be, right? Put some bees in a box and maybe get some honey in a year or two. I soon found this was a far too simplistic idea that I think too many first time beekeepers start with. After a bit of research on the internet, which had far fewer reliable sources thirteen years ago, I managed to cobble enough information together to get me through that first Summer and the following Winter. At the time, I knew nothing about mites but did treat once in late October with Check-Mite strips after reading on the internet about the potential mite problem. I went into Winter after that late June swarm catch with my newly caught charges occupying two, ten frame deeps, no insulation and no early Winter feeding; they were on their own. Researching a bit more from internet sources, I made my first candy board late that Winter and learned a few lessons with that process along the way. I placed the candy board on the hive in mid-February and that was enough to keep them alive into Spring when that hive and a second hive from an early purchased package did provide some honey in my second year. From that inauspicious beginning I increased my hive count each year with a few splits and additional package purchases also often losing a few each Winter. Over the following years, I made mistakes along the way and continued to learn and refine my techniques while getting at least one hive through each Winter with one to four hives through the next five or six Summers. After ten years of trial and error, I have come up with a winterization system that seems to work for me.
Start Preparing in Summer
The first key component of preparing for Winter is to keep your mite counts under control during the previous Summer. If my mite count tests dictate a need for treatment, I like to treat with Formic-Pro in late June or early July and again in late August or early September. Here in SE Michigan a 1% count in Spring and 3% count in Fall are generally accepted as the point at which a treatment is recommended. There are a variety of treatment options on the market that other beekeepers favor, but I can only relate to what has worked the best for me. Using either the powdered sugar or alcohol wash test provides a fairly accurate mite count. Collecting a half cup of bees for either test method is approximately 300 bees, so divide the mites found as a result of either test by three to get a percentage. Anything over three mites in Spring would reach the 1% threshold while anything over nine mites in Fall would reach the 3% threshold. As the queen starts to be shut down in the Fall, the brood chamber begins to be back filled with nectar, which may become capped honey. Just as the queen begins to lay fewer eggs, which will become the overwintering bees, the mites will be increasing their reproduction rate to take advantage of those larval bees that are building up increased fat stores to get them through Winter. This can lead to a mite population explosion if some intervention is not taken by the beekeeper. No Summer treatment for mites or a heavy mite count in late Fall seems the most likely greatest reason for loss of hives over the Winter in our area.
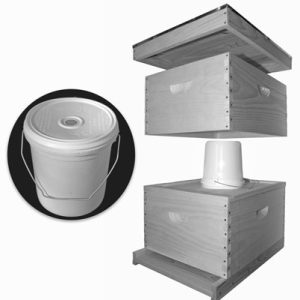
Another treatment I use is the oxalic acid dribble as late in the Fall or early Winter as possible. While the formic treatment will penetrate under capped cells, the oxalic acid vapors or dribble will not and therefore will not reach those mites under capped cells. That is why the oxalic treatment is used as late as possible when very little capped brood is present. I will get to the specifics of an oxalic dribble near the end of this article. But before the time for the oxalic dribble occurs, feeding your bees in the Fall will also assist in a strong population more likely to get your hive through Winter. In the Fall, any of the feeding systems using two to one sugar syrup by weight or volume will help the new Fall emerging brood build up body fat. So, as soon as honey supers are no longer on the hives, I will add a liquid sugar syrup feeder to my hives. These are usually inside top feeders or inverted buckets over the inner cover hole surrounded by an empty super box. These stay refilled while Fall/early Winter temperatures stay above freezing. If there is a warm week, the bees can easily go through a gallon of sugar syrup if there is no Fall nectar flow going on.
When Temperatures Drop
I normally take each of the actions below at the same time, once temperatures are consistently forecast to drop below freezing at night. The first is a switch to a candy board or granulated sugar feed. In my first half dozen years of beekeeping I used candy boards. This is where about five pounds of sugar is dissolved in a cup of water and brought to a rolling boil where the dissolved solution will normally turn clear at the 260°F (127°C) to 270°F (132°C) range while stirring constantly. At this point, when allowed to cool to about 180°F (82°C) and poured into a form, it should solidify to a hard candy state. This hard candy board is set on the hive, candy side down, for the bees to use as a food source over Winter as needed. As an aside, I once assisted a new beekeeper one Spring. She had her son place the candy board on the hive that previous Fall, which he did with the candy side up. It was an honest mistake; the bees failed to come up through the center hole and never touched the sugar candy resulting in the loss of the hive.
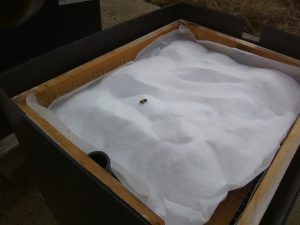
Since those first years, I have come up with an easier method that also seems more beneficial to the bees. I staple a one-half inch square piece of hardware wire mesh, often called one-half inch hardware cloth, to a three inch deep super spacer and lay a piece of baking parchment paper on the wire mesh. Several knife slits in the paper give the bees a starting point to chew through to reach the four to five pounds of granulated sugar poured on top of the paper, if it is needed as an additional food source. In addition to providing a supplemental food source, the granulated sugar also absorbs moisture which would otherwise condense and fall back on the bees. Bees can tolerate the cold but cannot tolerate being wet and cold. The first year or two with this method I simply used newspaper. I found that the bees can easily chew through most of the newspaper and much of the sugar falls to the bottom board. With the baking parchment paper they tend to chew through one or two spots and work out from those spots wasting less of the sugar falling to the bottom of the hive. Any moisture hardened sugar can be collected in Spring and reused the following Winter.
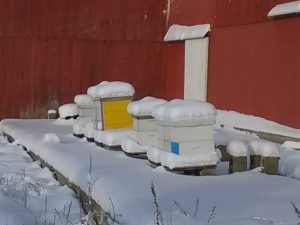
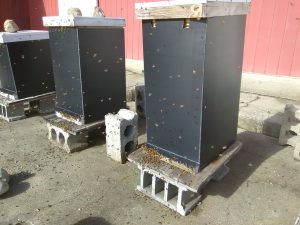
Another thing I have found to be useful is a one inch thick piece of foam insulation that just fits inside the outer cover. For several years, I removed this outer cover insulation piece in the Summer. But then, leaving it on year round, I found it decreased the Summer heat radiation through the metal roof of the outer cover which also decreased the amount of bearding on hot Summer days. So, now it is left on year round. I also add an insulation sleeve around the outside of my hives once the temperatures are forecast to be consistently below freezing at night. I use ¼ inch black plastic coroplast sheets measured a quarter inch longer than each side of my hive supers folded at 90° angle on the corners and using gorilla tape on both inside and outside of the first side taped to the fourth side corner. This is the same hollow core material used in campaign signs and can usually be ordered through a local print shop or graphics arts store. One could also use any of the bee blankets sold in bee catalogs or simple wrap a hive with stapled tar paper. Whichever material is chosen, the beekeeper needs to be sure there are bottom and top openings left for the bees to exit and enter on those occasional warm Winter cleansing flight days.
There is one more feature that I have found to be useful to enhance the chance of overwintering success. This is called a Vivaldi board. The commercially sold ones come as one piece, much like an inner cover, with the sides about two to three inches deep matching the size of the other supers on the hive. I simply leave the inner cover in place and over that, set a three inch spacer the same size as my supers. Each spacer has four or five, half inch holes drilled in each narrow end to allow for ventilation. Sitting on the inner cover inside the spacer is a folded piece of burlap which absorbs any moisture coming up out of the hive. I often find the burlap quite damp in the center, but have never seen water droplets that could drip back on the bees as was the case before I started using these homemade Vivaldi spacers with the burlap. The air circulation evaporates most of the moisture gathered by the burlap. I cover the inner cover hole with a taped piece of screen to keep the bees out of the Vivaldi board space. Just under the inner cover is where my wire mesh granulated sugar feeder sits. The outer cover with its insulation insert sits on top of the Vivaldi spacer. With the addition of a late Fall or early Winter oxalic acid dribble, I have had an 85% overwinter success rate these past three years, going nine for nine my first time three Winters ago when using all these techniques together. Each of the past two years I lost one or two hives while trying slightly modified approaches. I have learned to go with what works for me which brings up my last treatment technique explained below.
The Oxalic Acid Dribble
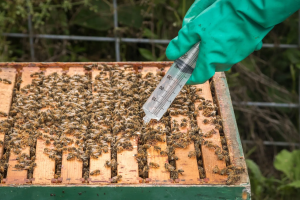
Accepted practice states that an oxalic dribble can be done in temperatures as low as 40°F. I like it to be a bit warmer and not get below 40°F the following evening or two. The bees need that time to clean themselves of the moisture that is being dribbled on them. Based on past forecasts, I have done an oxalic dribble as late as November 19 or last year on November 8. Why do I wait so long? First off, bees were still bringing in pollen two weeks earlier after a rainy week. Secondly, I have had late start hives still taking in 2:1 sugar syrup. That indicates the queen has not been fully shut down and there may still be quite a bit of capped brood in the hives as warm Fall temps sometimes allow a much later slow down. I want to have as little unhatched brood as possible doing an oxalic dribble, as that is when it is most effective. One could do an oxalic vapor, but I have not invested in the more expensive vapor equipment and have had good luck with the dribble. Additionally, there are numerous hazard cautions to not breathe any oxalic vapors and the necessity to wear an effective gas mask if using the vapor method. I have done two types of dribble; the first is where in the a.m. I do a 1:1 sugar syrup dribble, followed about three hours later with the oxalic acid dribble. The theory is that the bees cleaning process after a first dribble consume the sugar syrup and by the time of the oxalic dribble, having engorged on sugar syrup, ingest less of the oxalic. They are simply cleaning it off and not eating as much of it, which can be detrimental. When I used this method all nine of my hives came through Winter just fine. The other method was doing the dribble alone without the prior 1:1 sugar syrup “practice.” I did lose two hives when I used that method alone. There could have been other factors of which I am not aware; however, I did try to match conditions of each application as best I could each different year. I have found it is better to err with a weaker solution rather than a stronger as it seems to be just as effective. I plan to lessen the oxalic grams by about 10% from that shown in the table (next page) provided by a reputable bee company. I have been surprised by the large amount of mite drop on screened bottom boards after using an oxalic acid dribble, which seems to prove its effectiveness.
| Oxalic Crystrals (g) | Hot Water (g or fl oz) | Sugar (g or cups) | |
| 20 hives | 35 grams | 600 grams or 24 fl oz | 600 grams or 3 cups |
| 10 hives | 17.5 grams | 300 grams or 12 fl oz | 300 grams or 1.5 cups |
| 5 hives | 8.75 grams | 150 grams or 6 fl oz | 150 grams or 3/4 cups |
Even if you only need enough for one or two hives, use the five hive recipe and discard any surplus, as it is hard to accurately mix smaller quantities.
My Treatment Method
1.First, get your equipment lined up. Rather than pay $20.00 for an oxalic kit in a bee catalogue (gloves, syringe, 35 grams oxalic crystals, safety glasses, etc.), purchase a 50 ml syringe at most dollar stores or pharmacy chain stores for $1.00.
2.Also buy a package of appropriately labeled and legally approved oxalic acid crystals from any of the major beekeeping supply companies or another local beekeeping supply source. Since you will only use 35 grams per treatment for 8-10 hives or 8.75 grams for the five hives mixture, the 340 gram size will last a long time if tightly closed after opening.
3.A pair of rubber or nitrile gloves and safety glasses; the mixture is a mild acid so it can burn, do not get it in your eyes or on your skin. It exists in very mild form naturally in rhubarb and leafy greens.
4.A gallon glass jar for the mixture, do not use plastic as the acid will react with some plastics. Measure the ml of warm/hot distilled water into the glass container. (If you have hard tap water, the crystals do not dissolve as easily as in distilled water.) Dissolve the crystals and then the sugar as it works better in that order.
5.A kitchen scale to measure out your grams. There is extensive research that shows bees can tolerate a stronger mixture of oxalic crystals. Ref: http://scientificbeekeeping.com/oxalic-acid-treatment-table/ I have been happy with the results of what is considered a milder mixture and my mite counts have been much reduced going into Winter.
Application Steps
Lightly smoke your bees down between the frames.
Fill your syringe with the medicated syrup to the 50 ml mark or if using a 25 ml syringe fill and refill once.
Starting at one end of the frames, dribble five milliliters of the solution along a seam that contains bees. (I like to start at the far end and dribble toward me.)
Once you have dribbled five milliliters, you must go on to a new seam. (A seam is the space between two frames or the space between a frame and a sidewall.)
After each seam of bees gets five milliliters of solution, you are done.
In any case, you should not go over 50 ml per colony of ten frame deeps. If the hive has more than 10 seams, dribble where the most bees are. Alternately, you can give less than five milliliters per seam and do more than 10 seams, but you should not go over five milliliters in any one seam or 50 ml total per colony. My hives have two deeps, one directly over the other so the liquid dribbles down through both deeps.
Remember to apply the mixture directly onto the bees. Mixture that lands on the woodenware will be ignored by the bees and not moved throughout the colony.
As stated above, I found the technique used by a reputable beekeeper that practiced using a one to one (by volume) sugar to syrup mix in the a.m. and going back through with the oxalic mix dribble three to four hours later.
One last note: My research found that it is not recommended to store unused oxalic acid mixture for more than a day or two as it loses its potency over time. Discard any unused portion. Oxalic acid may be neutralized by adding bicarbonate of soda. This will produce bubbles of carbon dioxide that will dissipate without hazard in a normal environment. Once the acid has been neutralized, the addition of more bicarbonate of soda will not produce any more bubbles. The neutralized solution may then be disposed of by tipping it down the drain. It is worth noting that although oxalic acid is not classed as an RCRA hazardous waste, it is worth exercising some care when handling it. As noted before, oxalic acid occurs in a very mild form in rhubarb and leafy greens. Whether using Formic-Pro, oxalic acid dribble or any other chemical application, follow the manufacturer’s instructions or thoroughly research a reputable source before using any mite mitigating chemical. Your beekeeping experience could vary based on your environmental conditions, experience or state of your hives. But if you are looking for some additional winterization techniques, you might give some of these a try.


